


Patchwork English Paper piecing
English paper piecing has been popular since the 18th century in England and is sometimes referred to English paper piecing because of its popularity in Britain.
This is a wonderful hobby and is relatively easy to put together even to make something as large as a quilt for your first trial ( I did) . There are no fancy stitches required and if you can sew a button on you can patchwork paper piece!
Firstly, I am going to use the most popular shape to show you how to construct your first pieces to get you started, which is the hexagon.
You really don’t need to spend a lot of money to get started. There are lots of things on the market if you want to spend money with pre-cut paper patterns and pre-cut fabric hexagons. Or you can start from scratch using everything that is generally in everyone’s household.
You can use tracing paper, freezer paper, card, plastic or even printer paper to make your templates. I do have a plastic template (that was a gift) but you can easily print off the shape from google if you find you cant get it accurate enough by doing it yourself. Everyone has fabric, maybe not on a roll but you can used old clothes (laundered) or bedding etc, it doesn’t have to be new as long as its clean.
I made my very first quilt out of my daughters clothes from when she was a toddler together with parts of my maternity clothes that I wore when carrying her. It was one of those projects that took years to complete, not because it was difficult, but when I started it when she was about 6yrs old, (she’s 35 now!) I found myself with three part time jobs (we were broke) and no time to do it. It got put away for years, and then I stumbled upon it when we were unpacking boxes from our last house move. I made a conscious effort and completed it about 7yrs ago. I wish I had a photo to show you but I forgot to take one before I gave it to my daughter. She was overwhelmed with it, remembering her dungarees and her little pink dress and other favourite clothes that she used to love, so it was well worth constructing it 🙂 But all it cost me was a needle and a couple of reels of cotton thread!
So what I am trying to say is, that it can cost you as little or as much as you want it to basically!
The beauty of this template is, you measure the inside of it for the papers and the outside of the hexagon for the fabric allowing an accurate amount all around for wrapping it around the paper. You can get 12 hexagons out of an a4 sheet of paper and these can be reused when they are removed. The template is 2¾” X 2½” (7 X 6.5 cm) outer measurement. Inner is 6 X 5 cm.

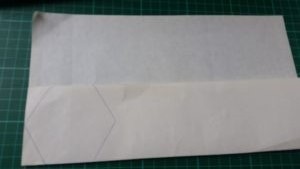

If you fold your paper length ways into three, then fold it in half and in half again (see photo) you end up with 12 little squares. Draw your hexagon, if your using a plastic one like mine don’t forget to draw it from the inside. Then get a simple craft knife (mine came as a pack of five from the poundshop :)) and using a ruler to cut against you can slice through them all together ensuring they are all cut equally. The little red pegs came from China off ebay, another bargain at just £1 for 50 with FREE postage !!!! They are so useful, I use them everyday on all my crafty projects 🙂


Then cut your fabrics. This time you are measuring from the outer edge of the template but you obviously can’t use your cheap craft knife because it will rag the fabric not cut it! So it’s either carefully cutting each piece out with scissors ( I did this with my first one) or if you have a rotary cutter you should be able to cut through at least four pieces at the same time, depending on the thickness of your fabric.


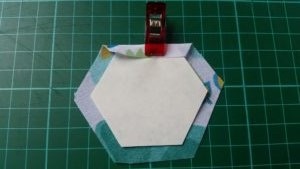
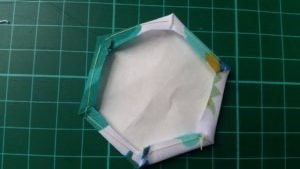
Now you have your bits and pieces together you can get started! Centre one of your papers on one of the fabric hexagons and fold one edge over the paper. You can secure this with a paperclip or a peg and then do one of the other sides so that you can tuck the corner over (see photo) making a nice sharp edge. Then, using a contrasting thread so its easier to remove later, sew a couple of stitches over your first fold then continue to your second and do the same again until you have been all around your hexagon. You can if you prefer, sew through the paper, it will pull out later anyway. I prefer not to pierce the paper so that I can re-use it. Also do not pull the thread tight, just over sew a couple of times on each fold to secure it.


Continue doing this until you have all your pieces ready. This is the time to iron them if needed, ensuring they are nice and flat before you start to make your patchwork quilt? cushion? project 🙂

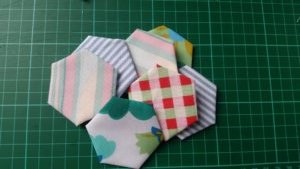

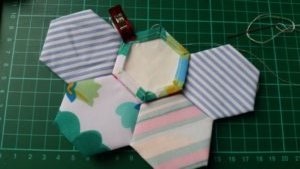
When your first seven pieces are complete, this is called a grandmothers flower garden when sewn together. Its a good idea now to arrange the pieces into the desired pattern. Swap it about a bit until your satisfied you’ve got them in the pattern you want.


Next join the first two pieces together by using small over stitches called whip stitch. Use the hexagon that you’ve decided is going to be the central and sew it with one of your outer pieces. Be careful to catch just the edge of the fabric with your needle and don’t sew through the paper. Then when you turn the hexagons over you will not see any stitches 🙂


I use my pegs to hold everything in place until I have stitched the side. Keep building around your central hexagon. See photos.

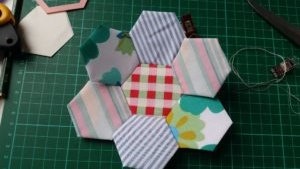
Then when your central hexagon is surrounded, now is the time to sew up the sides of the outer hexagons. This is your first ‘flower’. The paper should remain in place until completely surrounded then just flip it out.
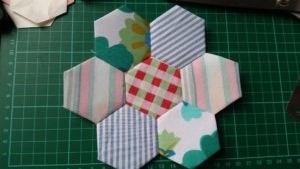
You can keep adding to this first flower or start a new one, waiting until you have several before you start sewing them together. Sometimes I think this is the best option so that you have the choice of swapping the flowers before sewing into place. Or you can use them as an appliqué flower on a cushion or bag?
This project is wonderfully portable and is very addictive! Once you start you wont be able to put it down unless you have 3 part time jobs, 3 kids and 6 Old English Sheepdogs, which I did when I first started!!!!!
Love your website thanks
Thank you xx