Painting stones
This is a really great hobby and you can create some beautiful painted stones and use them as paper weights or for unique gifts. You don’t need a lot of expensive tools either, you can use cheap nail art brushes that you can get off ebay and acrylic paints and maybe inks. You only use such a little amount on each stone. This is all that you need to get started :
- Stones different sizes
- Primer
- Acrylic paint
- Artist / nail art brushes
- ink (optional)
- Clear varnish (spray is best)
- You can also use Sharpie pens 🙂
Firstly, prepare your stone. I usually gather mine from the beach. They have been washed naturally and basically just need a fresh water rinse. But if they are picked from the garden you need to scrub them thoroughly. They need to be completely free from any soil and grot or the paint will not adhere well.
Then when your stones are completely clean and dry, you can paint them with primer. Paint one side and allow this to dry before flipping it over to paint the other side. I usually do two coats each side.
When you are sure both sides are completely dry your ready to start painting 🙂
Let your imagination run loose. You can do just patterns or write quotes or make animals in fact anything that will fit on your stone!

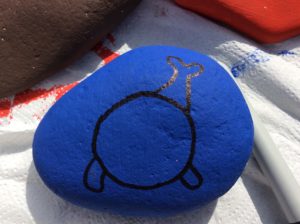
This is a beach stone that my granddaughter Lola made for me when she was just 6 yrs old. I had two Old English Sheepdogs at the time and I love it and it has been my main paperweight now for the last 4 years when she made it. When she made this for me I was overjoyed and couldn’t wait to gather some stones of the beach and have a go myself. But mine are not as good as the original one she made for me 🙂
This tutorial one is my tree of life stone 🙂 I love the tree of life in any form
These are my cheap nail art brushes that are perfect for the job!


After you have ‘sealed’ your stone paint it all over in the colour of your choice with acrylic paint and let it dry. It doesn’t take long only about 15 minutes. Then with brown draw a rough picture of a tree. When your satisfied that you have the shape as you want it paint it a bit more solid. Select your colours and blob some lovely bright colours straight from the tube, no need to use a brush yet.


Build it up with blobs of bright acrylic paint, you really don’t need to do too much detail. But put as little or as much as you want to. If you have little peaks on your blobs just press them down with the end of your paint brush


Keep it colourful, keep adding colour and start adding green blobs now for your leaves.


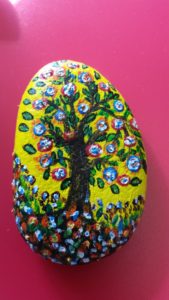
Introduce white into dark areas and then dampen them down with colour. When you are happy with the look, you will need to seal the stone to preserve your artwork. I use acrylic gloss varnish but you can use clear nail varnish it works just as well.


A few more by Lola